Author Archives: Sophie Whiptank - aka Bart

Unknown's avatar

About Sophie Whiptank - aka Bart

I'm just a bloke doing some stuff, the more interesting bits I post on my blog. Scroll down far enough and you'll see me riding from Melbourne Australia to Birmingham, England in 2014. But now I'm working on another project, a single cylinder motorbike engine at 2750cc!

CAD Model.

Standard

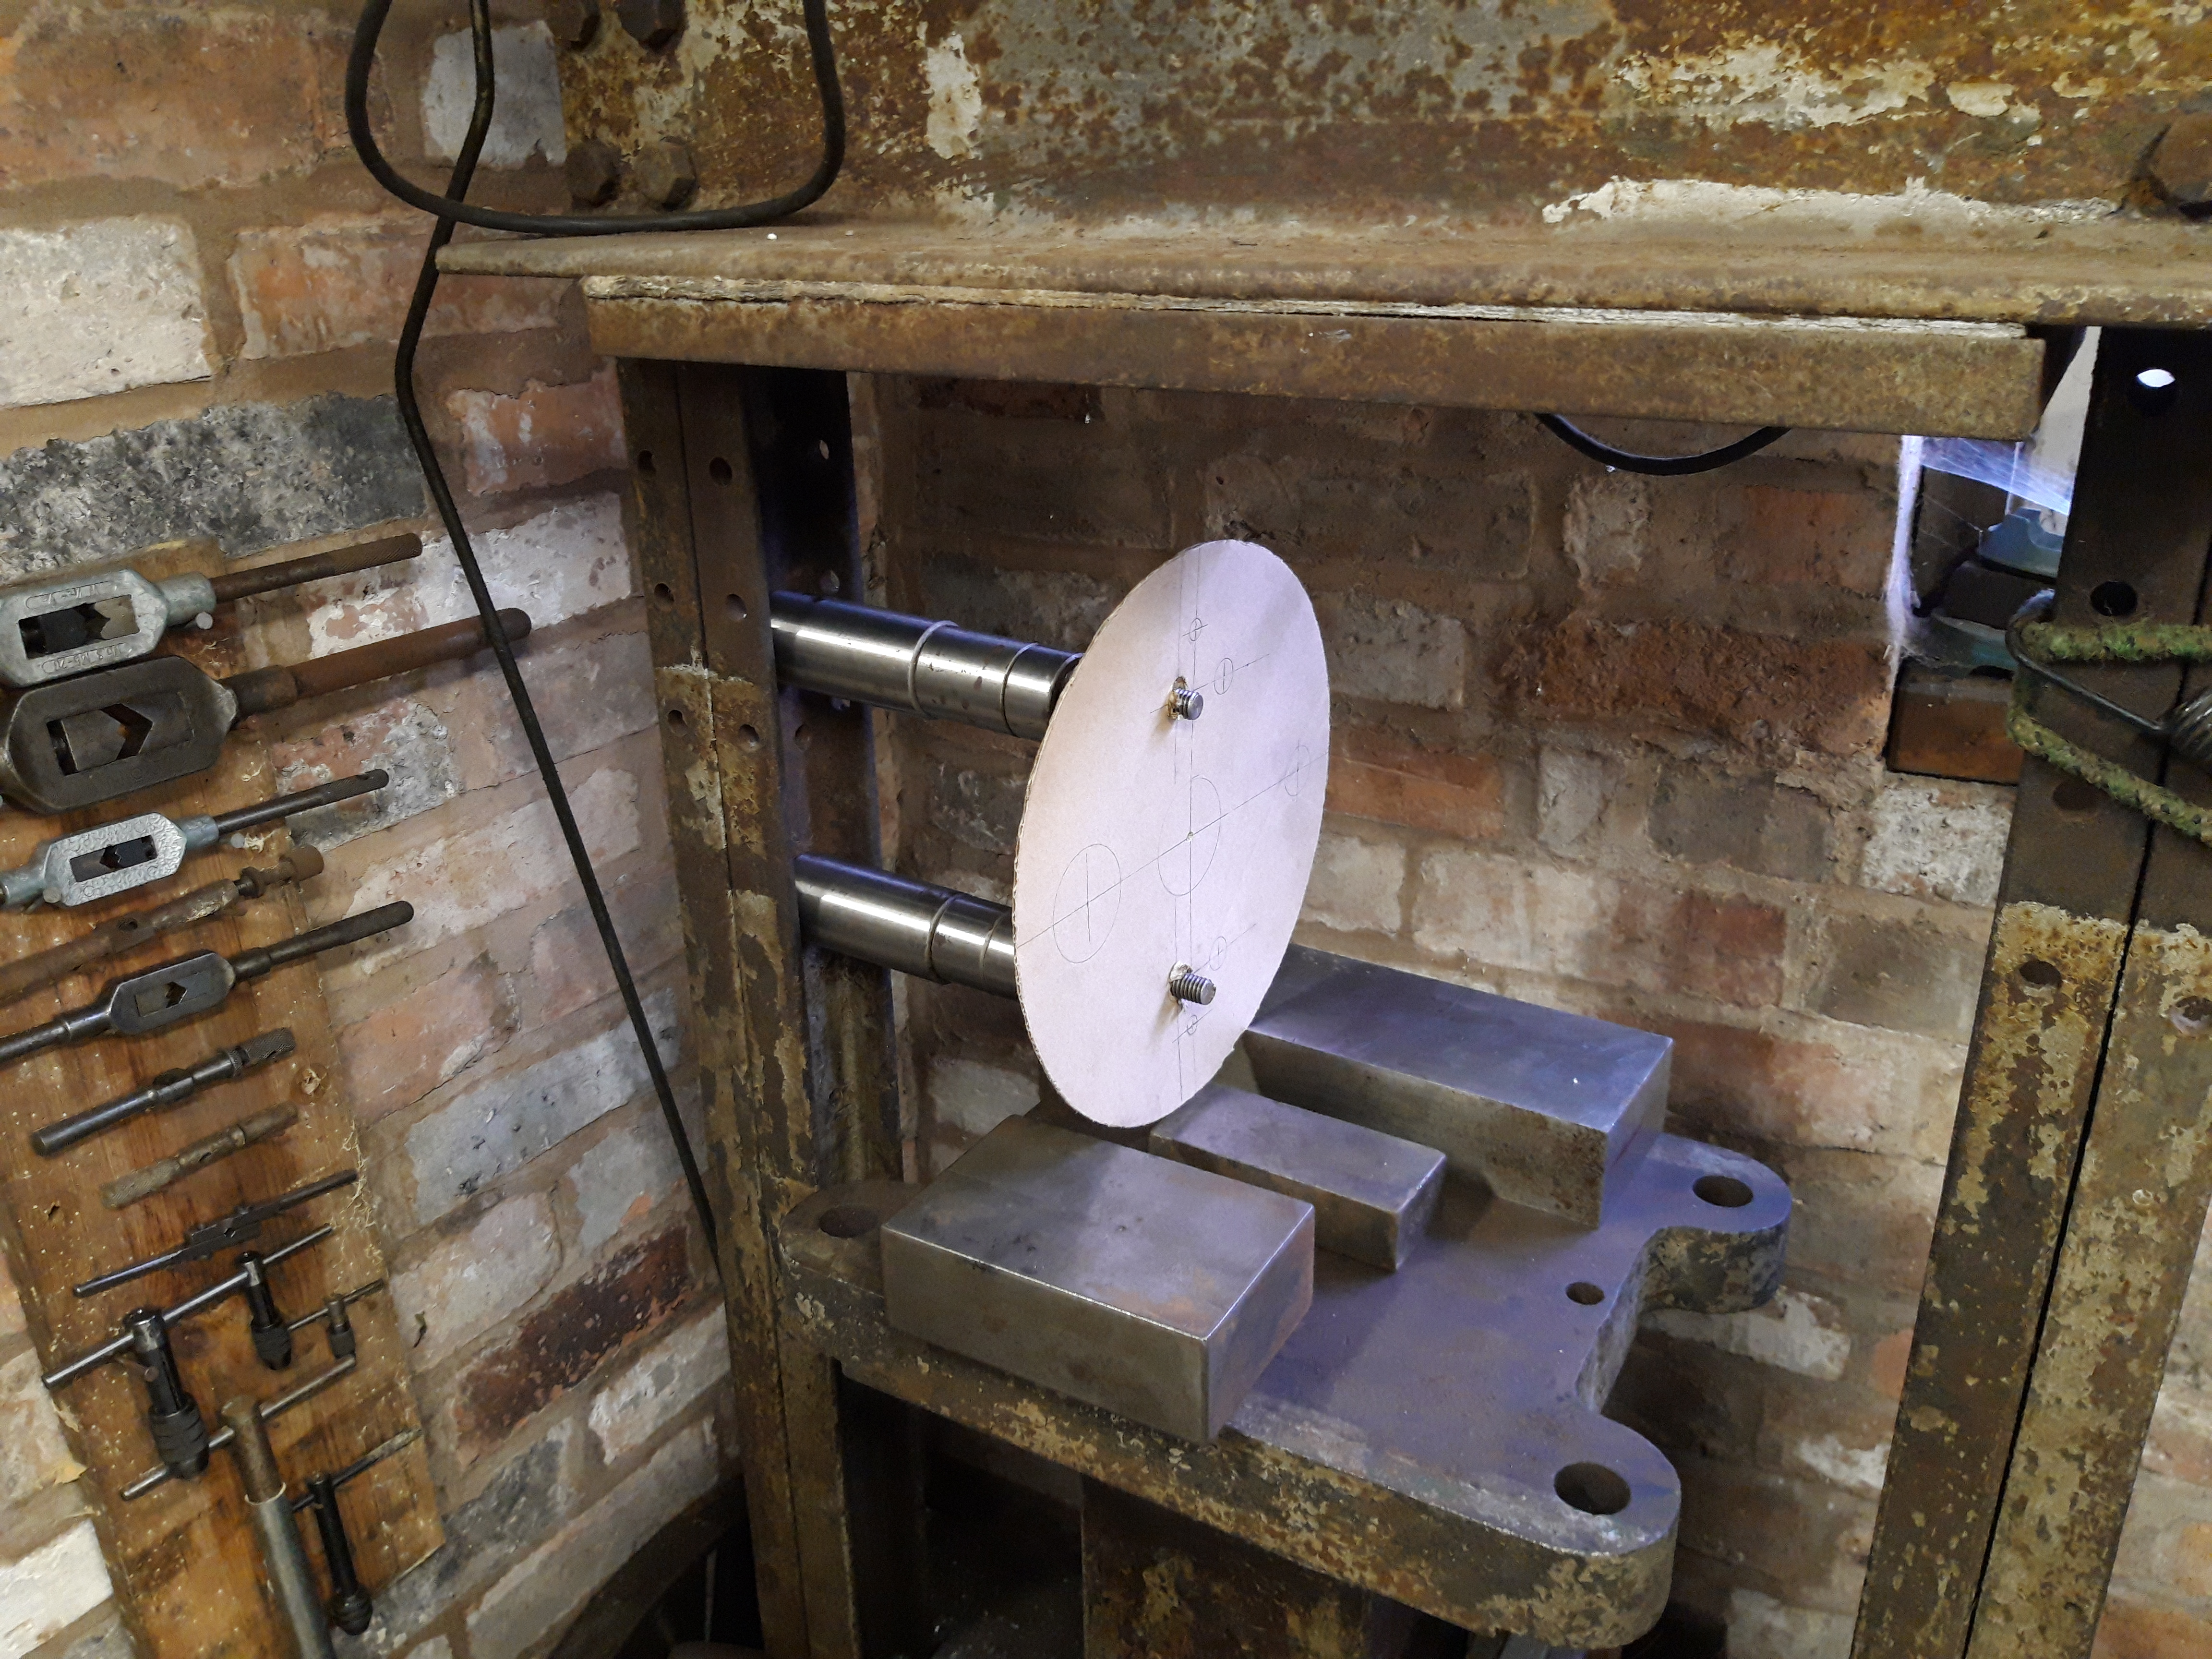
The flywheels have been clocked and have a run out of around 15 thou. Ideally this needs to be less than 5, so the wheels need to be both jacked apart and twisted around the crank pin. Accurately!

Jacking the wheels apart is fairly straightforward, but twisting them around the crank pin is more tricky. The plan is to mount them on the press, then use the press to push them around the crank pin.

The photo shows the CAD model (Cardboard Aided Design 😁😁) for bolting the wheels to the press. Bolts are in place ready for the heavy lift of the crank assembly onto the press.

Patterns completed!

Standard

It’s taken a while longer than expected, but the patterns are finished and ready to take to the foundry. Excellent work from Dave and I can’t wait now to see a set in metal. The picture gives you a good idea of the size of things 😁

The plan is to get a couple of sets making, so I can get a set machined in basic order to hold the barrel. This will be a full sized mock up to get the frame started, while the other set gets fully machined.

Bob has the machining plan sorted and a bit of a job on learning the CNC operation on the Bridgeport – but it’s easier than you’d think so I’m sure I can explain it!

Patterns coming along

Standard

Dave dropped round with one half of the patterns to show us the progress. Not far off being finished, the fillets, radii and draught angles are going in ok. The timing cover needs a second coat of paint and the main casing a full paint, but another week or two and they’ll be ready to take to the foundry.

I took the opportunity to pair them up with a barrel and for the first time the final dimensions are apparent. Bit of a lump but I can make it work. If the casting isn’t too pricy I’ll have two sets cast, and use the spare set and barrel for dimensioning the frame. The frame builders will appreciate a full sized engine to work with.

With all this activity going on, I need to start thinking about ignition and a carb. Neither of these are particularly challenging, I just haven’t put a great deal of thought in just yet.

Oof – get in!

Standard

With restrictions easing and a week off work, I was able to take up a very kind offer from Gary Stead at Stead and Wilkins (www.steadandwilkins.co.uk). They have some serious kit there, and amongst it all is a 100 Ton hydraulic press. Gary allowed me to use the press, which made light work of pressing the crank together.

A guy called George helped cart the heavy components across the yard, and operated the press after I’d set up the blocks. All done in about 10 minutes! Gary then showed me around the workshop, which was impressive to say the least. What a pity they’re so far for Leicester!

Definitely a company to keep in touch with, very capable and nice people. Biscuits are on me!

Gearbox jig

Standard

It’s been a cold few weeks and busy at work recent, so shed time has been limited. I finally got a couple of hours in yesterday and set about furnishing the mounting plate for a gearbox jig.

I want to be able to spin the torque converter and see what readings I get from the sensors on the box. I also want to check the direction of rotation as I have a nasty feeling it’ll be opposite to what I want.

I have a few old sets of sprockets from the mighty KLR650, a byproduct of all those miles I’ve put on it. So i have a borrowed electric motor spinning a rear sprocket, driving through an adapter plate I’ve just welded up. I’ve had no training on how to weld, but it looks pretty good in my book. I’m happy with that!

Patten maker’s rule – ok?

Standard

Had a update and set of patterns from the pattern maker Dave. They’re very good but not finished, no radii, draft angles or fillets yet. Changes now will be easy to accommodate, but after the radii and fillets are added much less so.

We’re having a good measure this week, returning the patterns once we’re happy for the final finishing. Within a couple of weeks we could have the finished items!

In the meantime, check out this patter maker’s rule. It over reads by 1 in 77, to allow for contraction of the metal on cooling. So the pattern can be measured and the measurements compared with the drawing, without any conversion. Very neat!

Best no leave that lying around, it would cause havock!!

Sleeve Drive Final Assembly

Standard

Here’s the final assembly of the sleeve drive crank, sprocket and drive pin. Finally looking like a proper engine component! The three holes in the sprocket are to allow it to be removed, rotated 120° and refitted. With the 44 teeth not being divisible by 3, this provides a finer valve timing adjustment than jumping a whole tooth.

Until the patterns arrive that’s all of the machining completed. Time to look at that gearbox and decide whether I can make it work for me.

Casting couch

Standard

While I was looking at Faceache on the couch, a good friend of mine Matt was busy with his home made furnace. It took a few goes and a couple of blown elements, but after a few days rough cast part arrived outside the garage.

The mighty KLR650 that took me all round the world had took the hump going up and down the Coventry Easterm Bypass. Who could blame it, given the wonders it has seen only to end up in such a miserable shithole. In winter. 😦

Anyway, the linkage under the swinging arm had seized solid. I had to cut it out and it cracked as a result. Mr. Kawasaki wants £160 for a new one. Plus £140 for a set of needle roller bearings. Plus £48 for a new spindle. And Mr. Uk Taxman wants his 20% VAT.

In an attempt to see what I can do for free with the tat lying around, Matt offered to have a go at casting a new one using the original as a pattern. This was an excellent start! His persistence paid off while I was still sat on the couch. Now known as the casting couch 😉

Sleeve drive setup complete

Standard

Here’s the final sleeve drive assembly, complete with chain tensioner in situ. The distance between centres is as drawn, with the adjuster fully in to give the full travel as the chain wears. Shown in the orientation it will take in the engine on final assembly.

It looks right and with the 9 holes (3 sets of vernier adjustment) we can get to within a single degree of timing. Spot on!

The valve timing needs some thought still as the Hercules was supercharged, so the inlet opens late. Static timing can be set with the drive sprockets, however, the relative timing between inlet and exhaust can only be changed by re-shaping the holes in the sleeve. I only have one sleeve so that’s a one way operation.

How much is too much? You will only find that out after you’ve done it and there’s no going back. Hmmm..